Home>Science>The Moon and Its Phases: Why Does It Change Shape?

Science
The Moon and Its Phases: Why Does It Change Shape?
Published: January 29, 2024
Explore the fascinating Moon phases with kids: Why it changes shape, its cosmic dance, fun folklore, and engaging activities for young astronomers.
(Many of the links in this article redirect to a specific reviewed product. Your purchase of these products through affiliate links helps to generate commission for Noodls.com, at no extra cost. Learn more)
Table of Contents
Welcome to the world of astronomy for kids! Have you ever looked up at the night sky and noticed that the Moon doesn’t always look the same? Sometimes it’s big and round, and other times it’s just a tiny sliver of light. It seems like the Moon is playing a game of hide-and-seek with us, changing its shape every night. But why does the Moon change its shape? Let’s go on a lunar adventure and find out!
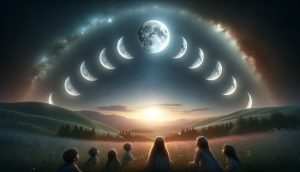
What Are The Moon Phases?
The Moon goes through different stages or “phases” every month, and that’s why it looks different to us on Earth. These phases are:
- New Moon – When the Moon is between the Earth and the Sun, and we can’t see it at all.
- Waxing Crescent – A tiny sliver of the Moon becomes visible. It’s like the Moon is taking a peek at us!
- First Quarter – Half of the Moon lights up the sky. It’s as if the Moon is saying, “Hello, I’m here!”
- Waxing Gibbous – More than half of the Moon shines, getting ready for its big show.
- Full Moon – The Moon is at its brightest, showing its full, glowing face to the Earth.
- Waning Gibbous – The Moon starts to hide again, showing us less and less of its light.
- Third Quarter – Once again, half of the Moon is visible, but this time it’s the other half.
- Waning Crescent – A tiny sliver on the other side shows up, whispering goodbye before starting all over again.
Why Does The Moon Change Shape?
The Moon doesn’t actually change its shape. It’s all about the sunlight and how it lights up the Moon. The Moon orbits, or travels around, the Earth, and as it moves, different parts of it get lit up by the Sun. This is what makes it look like it’s changing shape to us on Earth.
Imagine the Moon is a big, round cookie, and the Sun is shining a flashlight on it. As you slowly turn the cookie, different parts of it light up. That’s exactly what’s happening with the Moon!
The Sun, The Earth, and The Moon: A Cosmic Dance
The Sun, Earth, and Moon perform a beautiful dance in space. The Moon orbits the Earth, and the Earth orbits the Sun. This dance affects how we see the Moon. When the Moon is on the side of the Earth away from the Sun, it’s a Full Moon because the Sun’s light shines on the whole face of the Moon. When it’s between the Earth and the Sun, we can’t see it, and that’s the New Moon.
Moon Folklore: Stories in the Sky
People have made up stories about the Moon for thousands of years. These stories, or folklore, help us connect with the Moon in fun and interesting ways.
- The Man in the Moon: Some cultures see a face on the Moon’s surface and tell tales of a man living there, watching over us.
- The Rabbit on the Moon: In some Asian and Indigenous American folklore, a rabbit is seen making rice cakes or medicine, a friend to the lonely Moon.
- The Moon and the Ocean: Many stories explain why the ocean’s tides change, saying the Moon pulls the water towards it, making high and low tides.
Fun Moon Facts
- The Moon is Earth’s only natural satellite, and it’s about 1/4 the size of Earth.
- The Moon completes its orbit around the Earth in approximately 27.3 days, yet it requires roughly 29.5 days, nearly the length of 30 days, to cycle through all of its phases from one New Moon to the next.
- The same side of the Moon always faces the Earth. This is because the Moon rotates on its axis at the same rate it orbits the Earth.
Activities to Explore Moon Phases
- Moon Phase Journal: Keep a diary of the Moon for a month. Draw the shape you see each night and compare it with the phase calendar.
- Oreo Phases: Use Oreo cookies to represent Moon phases. The cream can show the lit part of the Moon – a tasty way to learn!
- Moon Phase Match: Cut out pictures of different Moon phases and mix them up. Try to put them in the correct order, from New Moon back to New Moon.
Conclusion: The Moon’s Magical Cycle
The Moon is a captivating part of our universe, much like the bright lights in the night sky. They remind us of the constant change and cycles in nature. Even though it might seem like the Moon is playing a magical game of hide-and-seek, there’s a beautiful and predictable pattern to how it lights up the night sky. By understanding the phases of the Moon, we get to know our closest neighbor in space a little better and connect with the universe in a special way.
So, the next time you look up at the night sky, see if you can tell which phase the Moon is in. Remember, it’s all part of the Moon’s journey around Earth, a cosmic dance that’s been happening for billions of years. And who knows? Maybe one day, you’ll share your own stories about the Moon and its phases, adding to the rich tapestry of tales that have fascinated humans for generations.